This blog describes how you can create a CloudFoundry and BOSH sandbox environment running on AWS in just 15 minutes.
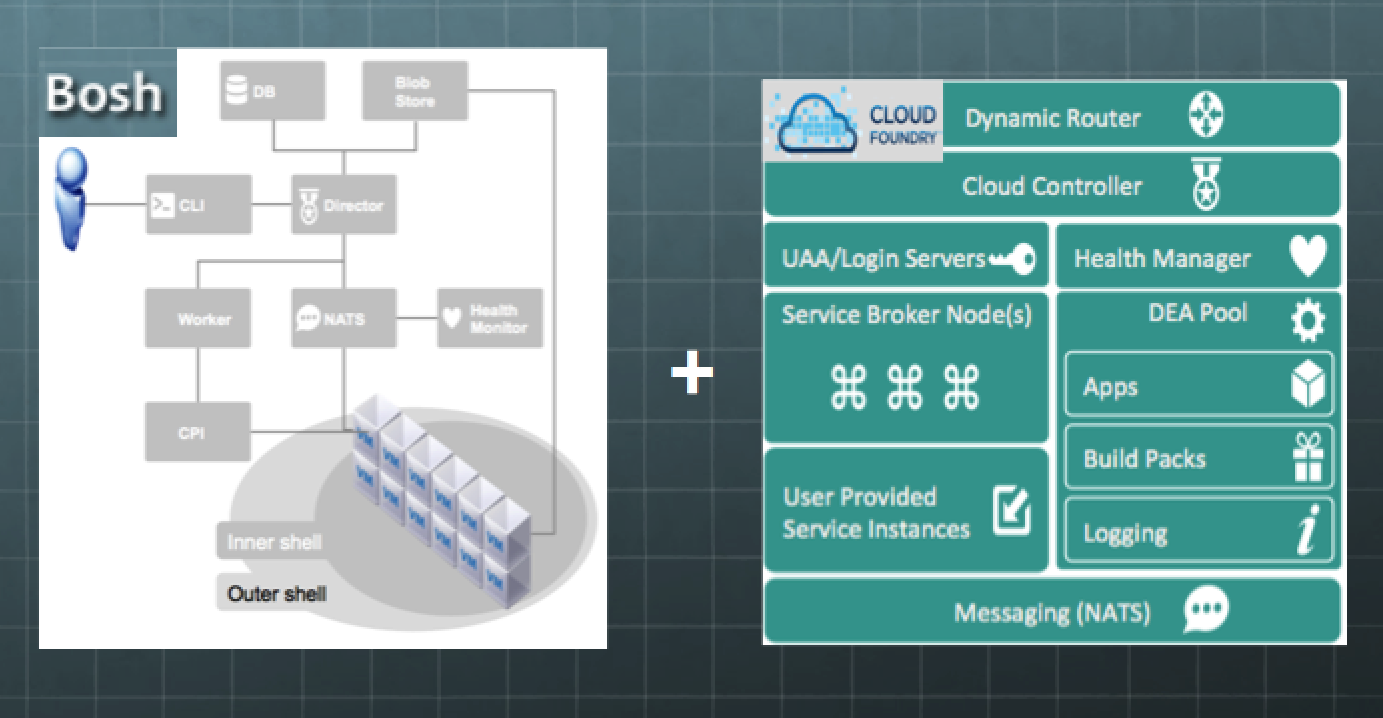
This environment is ideal for a sandbox development environment, to use and learn about CloudFoundry. The VM we create will contain the complete set of processes supporting CloudFoundry and BOSH, including the BOSH Director, CloudFoundry (release 173), BOSH CLI and CloudFoundry CLI, all running in a single machine.
The BOSH Director environment created is based on the bosh-lite project https://github.com/cloudfoundry/bosh-lite, that uses the Warden CPI to support CloudFoundry processes within kernel containers. Typically a bosh-lite environment takes hours to standup, but because we’ve packaged up the environment by pre-building and pre-loadeding a CloudFoundry release and their required stemcells into an AMI, the only thing left to do is to deploy the CloudFoundry release, which takes approximately 10 minutes to complete.
The video below walks thru the step-by-step instructions to create the CloudFoundry sandbox environment.
First we need an AWS account to create an EC2 instance. Login to AWS and click on the “Launch Instance” button and search for the public community AMI “boshliteCF173” that I created to allow us to build CloudFoundry environments on AWS. (Note that this AMI is currently only available in the US West N. California availability zone)

We will choose an instance type with no less than 16GB of RAM and 40GB of storage. In the video, we used the “c4.x2large” instance type, and made sure that “Auto-assign Public IP is enabled” so that we can reach our virtual machine on the internet. We also configured the security group with “All Traffic” enabled.

The AMI image contains the NoMachine remote desktop server, so we’ll need to download a NoMachine client to connect to this image. Use NoMachine to connect and use the userid/password pair “vagrant/vagrant” for login. We will use this same userid/password pair when you’re presented with the LX desktop screen.
Once we’re connected to the AMI, we need to reconfigure BOSH director and make BOSH CLI point to the BOSH director. AWS will assign an internal IP address that we will use to reconfigure BOSH director. We will edit the file “/opt/bosh/config/director.yml” and replace all (4) references of “192.168.50.226” with the internal IP assigned by AWS. We will get the internal IP address by typing “ifconfig”. Once the yaml file has been edited, we need to reboot the machine with “sudo reboot” to setup BOSH director properly. (NOTE: It is important not to add nor delete any spaces when changing the IP address, that is, avoid typing ” 172.168.2.2 ” if we only need to type “172.168.2.2”)

After the machine is rebooted, we will reconnect and use the BOSH CLI to target the BOSH director and to configure BOSH to point to a CloudFoundry deployment descriptor. The commands are “bosh target <internal IP>” and “bosh deployment cf-manifest.yml” respectively. Because we reconfigured the BOSH director that had previously been assigned an IP address of “192.168.50.226”, there are some tasks left in the background that are holding redis key-value pairs that need to be “flushed out”. So we will run “redis-cli” and type “flushall” and “exit” to get rid of these values. After that, we will ask BOSH to deploy our CloudFoundry (release 173) by running “bosh deploy”. This will start the compilation process for the CloudFoundry packages and the creation of kernel containers for the CloudFoundry environment. This last step will take around 10 minutes to complete, and when it is finished, we will have a complete CloudFoundry + BOSH environment.
To use the CloudFoundry environment and start pushing applications to it. We will target the url http://api.10.244.0.34.xip.io using the “cf” command, login as “admin/admin”, then create a organization and space. After that we simply use “cf” to push applications.
If you decide to stop the AWS instance and re-start at a later point in time, BOSH is configured to re-instantiate the CloudFoundry containers automatically, so we just need to wait for 2-3 minutes for BOSH to re-instantiate the CloudFoundry containers after the machine is restarted. We can monitor the progress of this process, by typing “bosh vms”. The command “bosh vms” lists the status of the 12 containers running CloudFoundry. Once we see that all 12 processes are in the “running” state, CloudFoundry will be ready to use. Lastly to secure the environment, we’ll change the password for the userid vagrant using “sudo passwd vagrant”.

